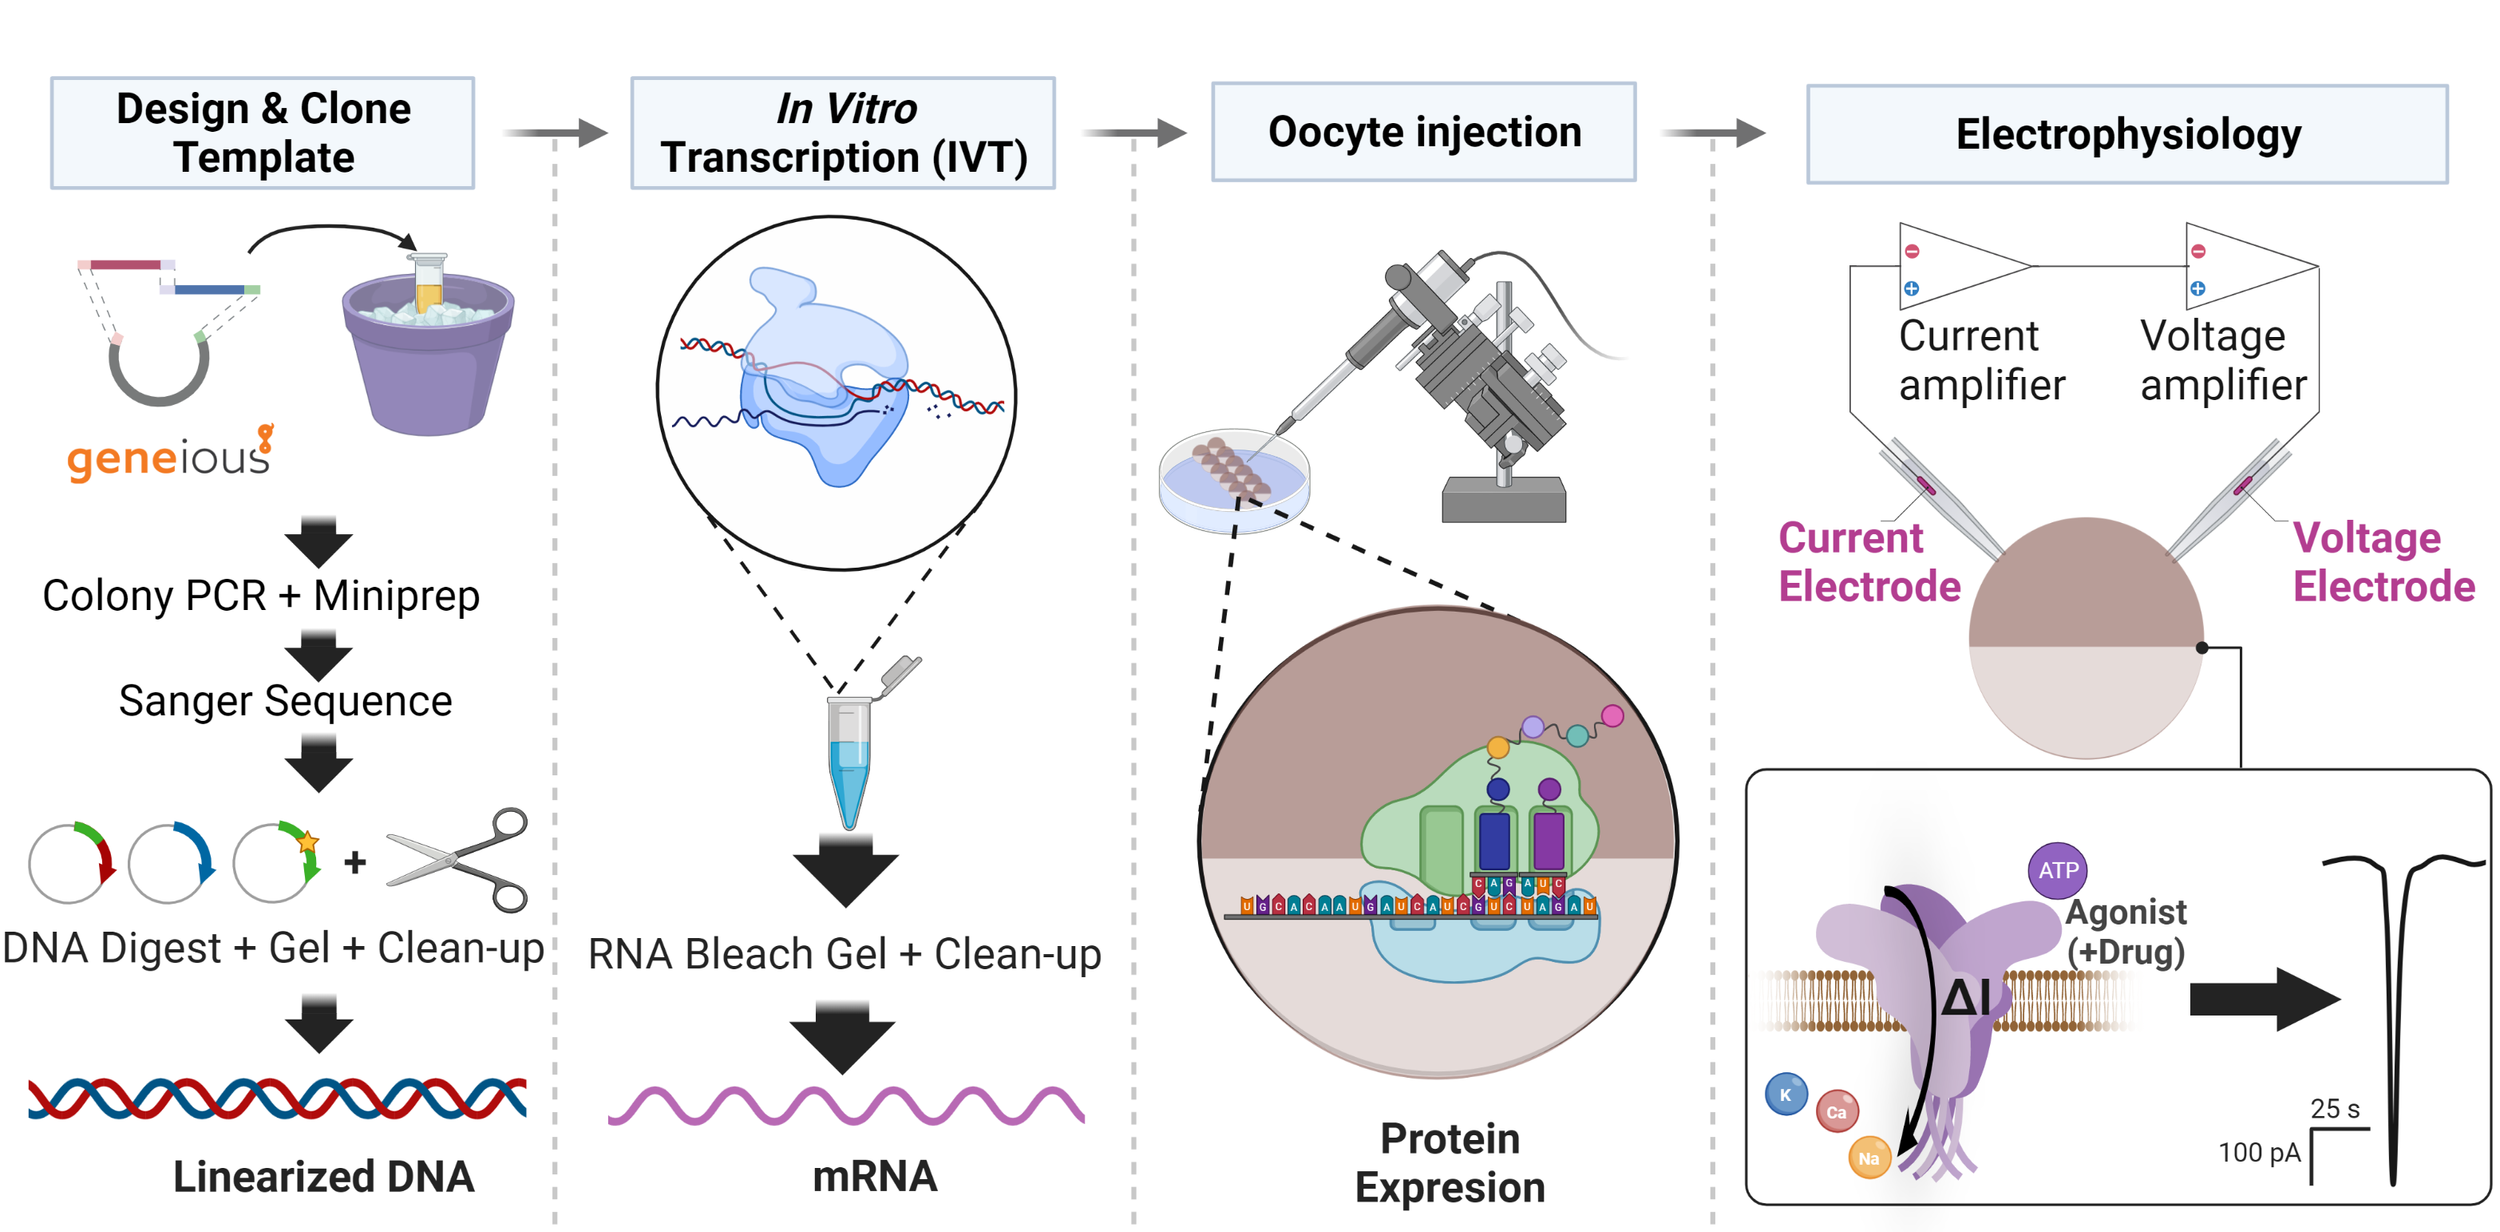
Cloning shortcut for two-electrode voltage clamp electrophysiology
I wanted to use this post to share the method I used to pre-emptively protect genes from degradation after RNA synthesis. Its not a perfect replacement for cloning, but if you’re short on time and need to protect you transcription products from RNAse degradation, this technique might be exactly what you need.
If you recall, during the summer, I set off on a cloning expedition to try to build a better plasmid for two electrode voltage clamp (oocyte) electrophysiology. The idea was simple: add transcription-promoting frog gene segments on each side of my receptor genes along with a 20+ adenosine residue (PolyA) tail to protect the future RNA from degradation.
A generic PolyA PCR experiment using a circular plasmid. DNA synthesis occurs 5’=>3’, so for the reverse primer, you have to add a PolyT sequence to the 5’.

A PolyA PCR experiment where you amplify the promoter sequence (T7 in this case) and the stop codon of your gene. If you want to truncate your gene near the end of the c-terminus, or if you want to add a small c-terminal tag (FLAG or 6xHis for example) PolyA PCR is very useful.
Full disclosure: the summer was rough. Hundreds of experiments failed, and I made a tough decision to shift focus to another project in our lab that wasn’t directly related to my PhD work. After 3 months of failing to get data, I knew that I was close to fixing the problem, but I was under an intense amount of pressure to fix the problem within a very tight window of time: oocytes arrive every Tuesday and Friday, and if you don’t have your RNA synthesized and ready to inject, you missed your chance to do experiments and have to wait a full week before you can even try to generate data.
In the past 6 months, I have been getting very good at molecular biology/cloning, and as a shortcut, I figured I might try adding the missing PolyA tail during a PCR experiment.
In theory, it should still protect the future RNA from degradation, and as long as I included the T7/T3/SP6 promotor region, it should work exactly like a linearized plasmid.

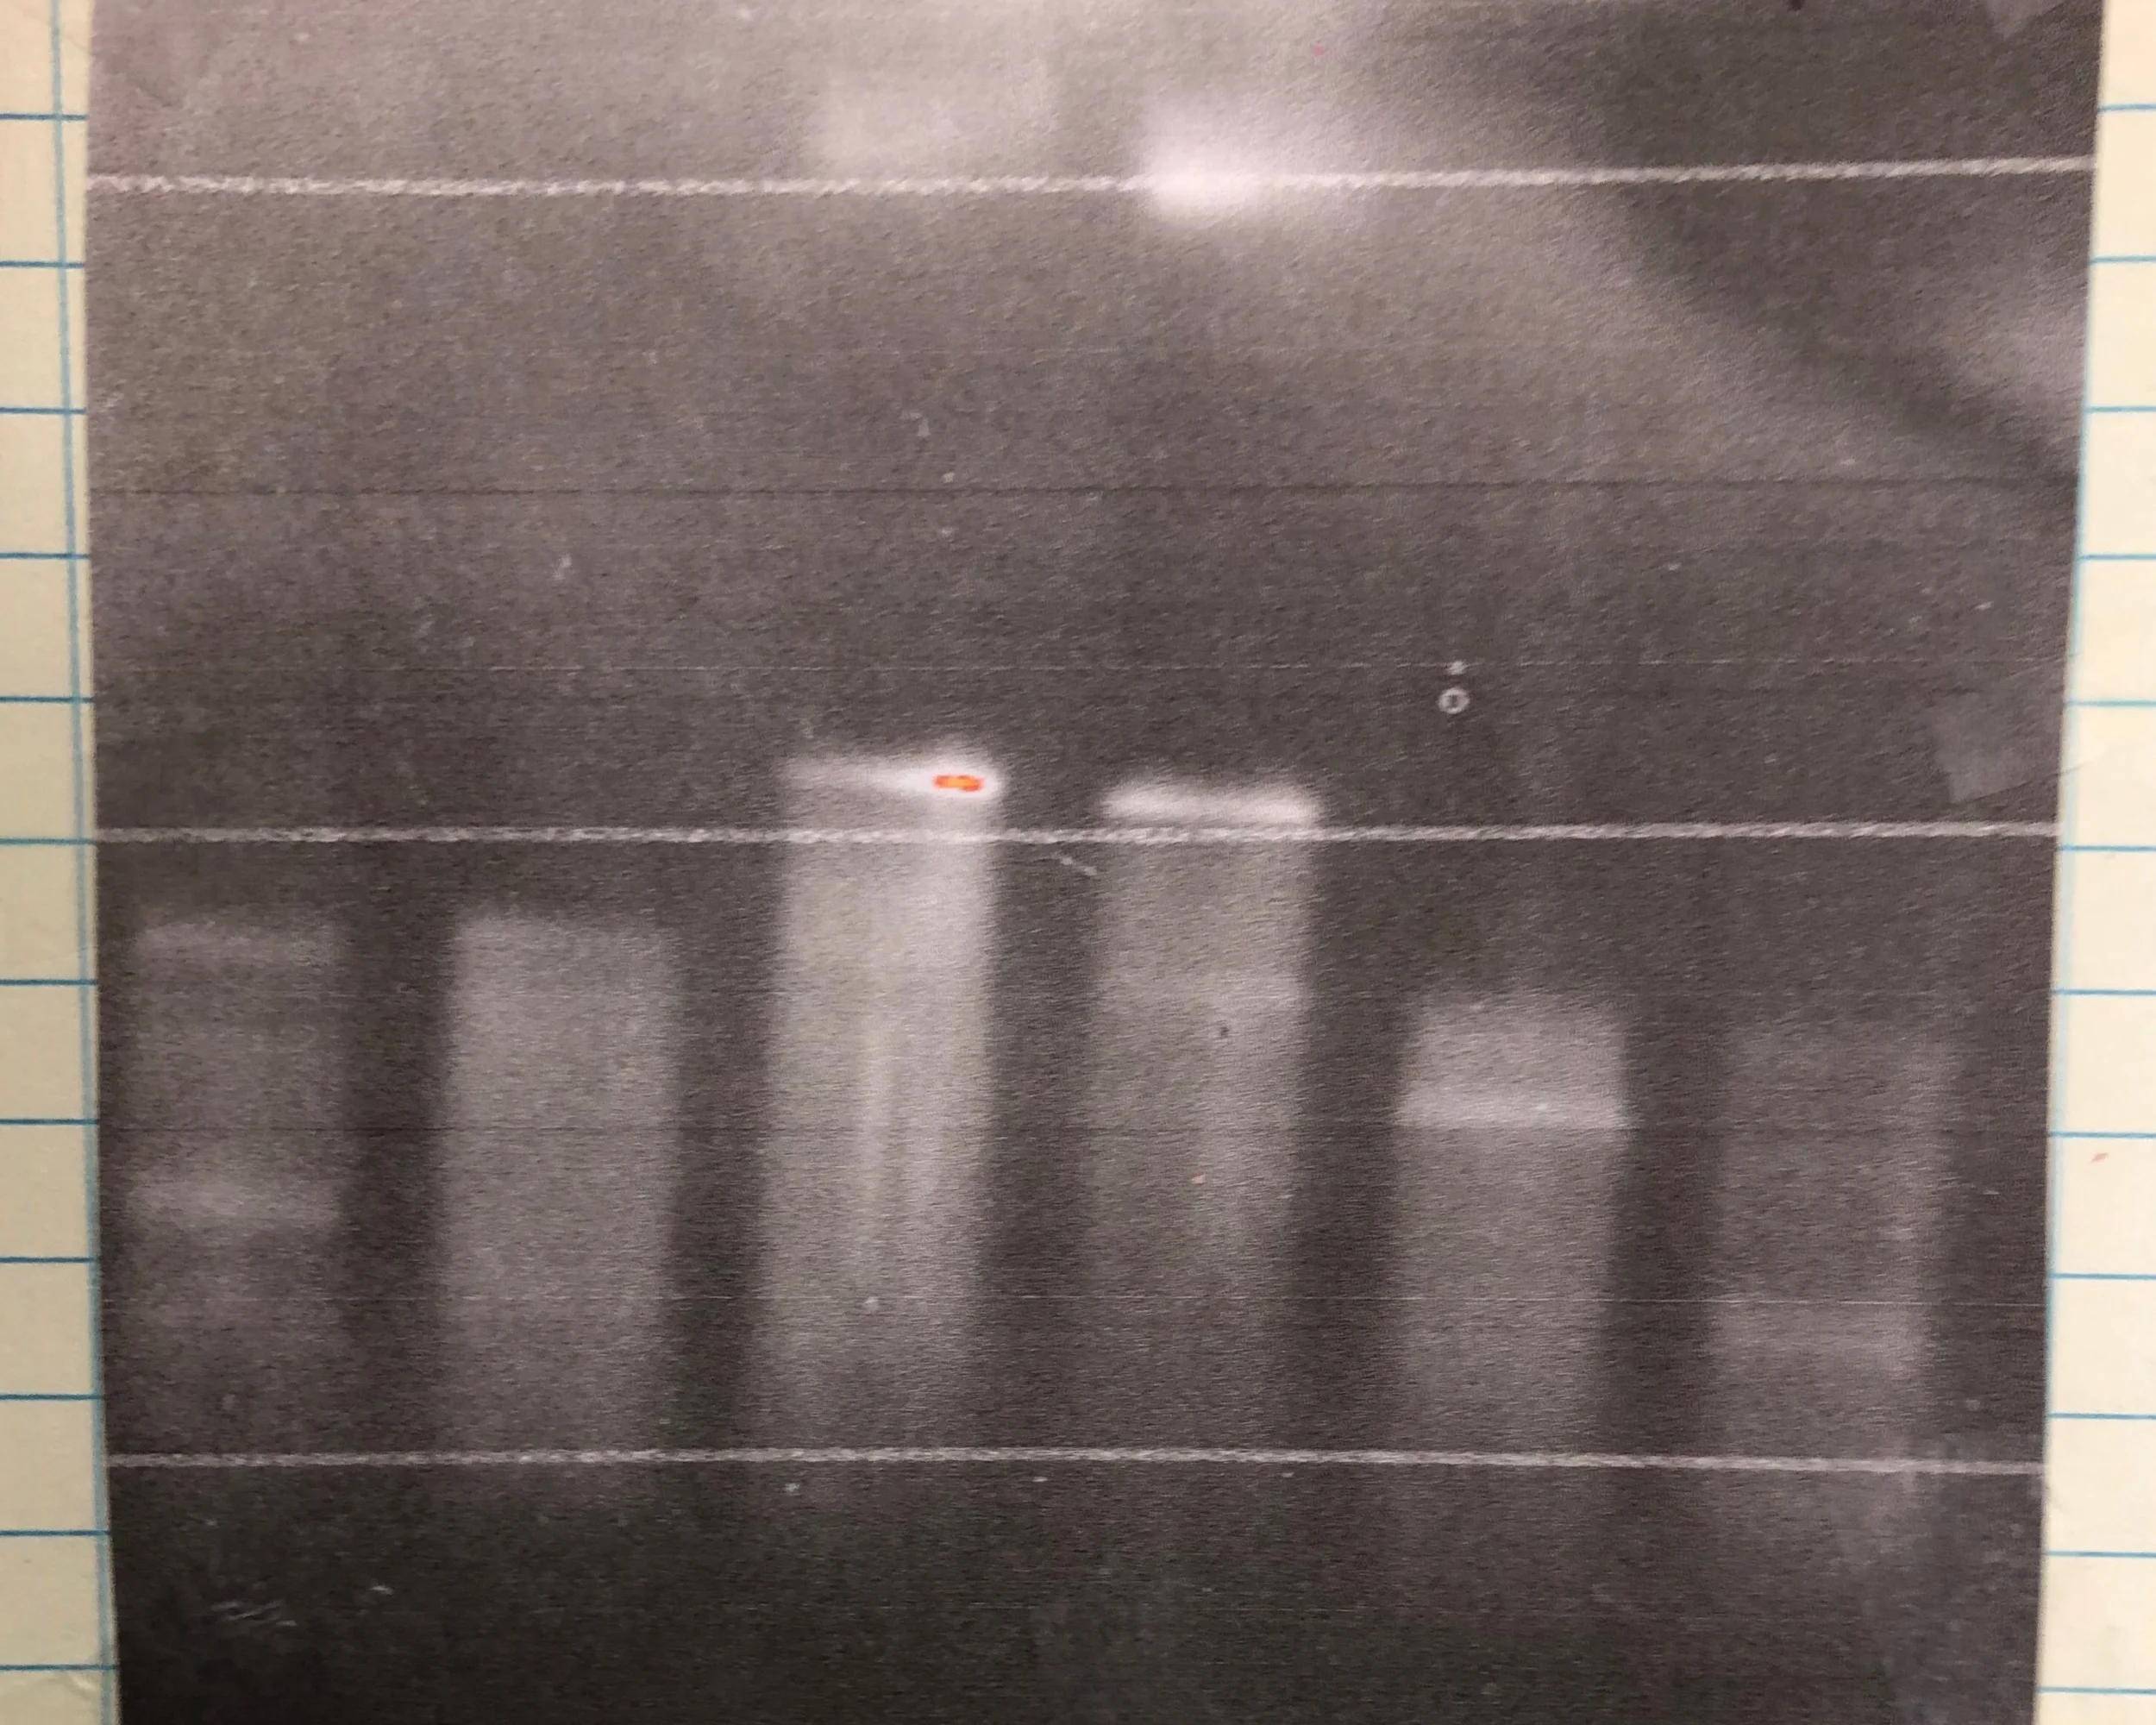
The first time I ever tried to add a PolyA tail during a PCR experiment. On the left are PCR products for sequence and ligation independent cloning (SLIC). On the right are the PolyA PCR products. Both worked very well at low (500 pg) DNA concentrations. 3 uL of a 50 uL SuperFi PCR reaction are shown on the gel.
Turns out, this method (I call it PolyA PCR) was wildly successful. Before this technique, electrophysiology used to be a grind. We would have to work on dozens of oocytes before we found one that had reasonable protein expression (several hundred nanoamps of current). With PolyA PCR, the RNA products we inject produce several THOUSAND nanoamps on almost every oocyte, something I’ve never seen before. These days, it’s rare for an oocyte to NOT express our receptors.

RNA bleach gel using products from a T7 mmessage mmachine RNA synthesis kit. 1uL of product was run on the gel after purification using the MEGAclear transcription clean-up kit. Bands are well defined. You see some streaking, but I want to blame some of it on the electrophoresis conditions (RNA bleach gels run extremely hot even at 50 mV.) I did 2x 20 min runs at 50 mV, changing the buffer (1X TAE) each time.
In terms of productivity, this has supercharged my project: I’ve generated more data in September of 2019 than in the previous 12 months combined. This advancement has also changed my work schedule, since I also come in on weekends and spend all day doing TEVC recordings. I’m super excited to come in and work on the weekend because its so much easier to generate data now. I’m also able to be more creative in designing experiments, since its safe to assume that the oocytes will express reliably. A super cool experiment I’m doing is injecting drugs/peptides into the oocytes before I do experiments.
PolyA PCR is just a much more rapid way of producing linear gene products than traditional cloning methods: 1 day for transforming bacteria + plating, 1 day for inoculating a miniprep + colony PCR, 1 day for sequencing results, and then you can finally digest your plasmid (if overnight, add 1 day), perform a DNA clean up and THEN start RNA synthesis, on oocyte injection day if you timed everything perfectly and nothing went wrong.

PolyA PCR optimization in progress. The theoretical Tm is 64 degrees celcius, but it looks like 67 degrees gives the best yield for one product (2A). On the other hand, we see no product for the 2D group.
With PolyA PCR, just use a high-fidelity polymerase (I swear by Thermo’s Platinum SuperFi 2X green master mix) and in about 2 hours (15 seconds/kB x 35 cycles), your ready to purify the linear gene product. Once you’ve purified it, you can then start RNA synthesis, possibly on the same day!
A few caveats: If you’re simply adding a polyA tail to a gene, you can (and should) use an already linearized plasmid, as Thermo’s T7 mmessage mmachine warns against having any circular plasmid during RNA synthesis reaction.
However, if all your genes are in similar plasmids, and you’re trying to have a pair of universal primer pairs (T7 + T3-PolyA, or vice versa) you’re going to have to use a circular plasmid, then gel-extract your product or do a DpnI digest. Thermo sells a SuperFi-compatible DpnI enzyme so that all you need do is a add a few microliters and then incubate at 37°C.
Another caveat is that you can’t mutate residues on your receptor of interest, but you can truncate your receptor if you’re interested. Just match the 20 base pairs you want, add a stop codon, and then add at least 20 PolyT residues.
Theoretically, you can still use the Platinum SuperFi polymerase for mutagenesis, DpnI digest + transform into bacteria (1-2 days) then inoculate for miniprep, while at the same time performing colony-PolyA PCR on the innoculants. You would technically have a gene for RNA synthesis before you would need to perform a miniprep, but you should still send it off for sequencing beforehand, so that you could be sure that it carries the mutation you want.
Caveat #3: since RNA synthesis requires 1-2 µgrams of linear DNA, you’ll probably use the entire PCR product during synthesis. In my opinion, its not a big deal, since PCR is fast/easy. Plus, you don’t need more than 1ng of starting gene for a >1 µgram PCR yield.
Caveats aside, this technique is ridiculously nimble; if your primer synthesis company can guarantee next day delivery of primers up to 60 BP, then you can cut project times in half! Spend a few injection rounds (Tuesday and Friday) investigating a specific mechanism, and if that strategy fails, just make new primers for an updated hypothesis (Monday of the following week), and the next day (Tuesday), your new primers are ready to PCR amplify and mutate your receptor, and by the next injection round, you’re ready to move the project in a different direction.
A few tips for optimizing PCR amplification of receptors for Two-electrode Voltage Clamp electrophysiology
It goes without saying but sequence your plasmid in both directions
Use a high fidelity polymerase
Gel verify everything
When designing primers, use a minimum of 18 complementary base pairs, and make sure the Tm difference between your forward and reverse primers is no greater than 5°C
G and C raise the Tm more than A or T, keep this in mind during the design process
Be weary of the hairpin Tm of your primers; I found that a T3 reverse primer sequence had a Tm very close to the hairpin Tm, which was affecting PCR efficiency.
Optimize PCR conditions, especially if you can perform gradient PCR. A molecular biology/cloning rule of thumb is to choose a Tm 3-5°C lower than the calculated number, to account for the presence of salts in your elution buffer if applicable. Thermo has an online tool for Platinum Superfi, and geneious will give you a rough Tm, a hairpin Tm, and a self-dimer Tm.
Remember to only count what is complementary when calculating the primer annealing temperature. If its not there, it doesn’t “count” (hence why PolyA PCR works.)
Keep your primer orientations correct! I still sometimes accidentally copy the complement to the reverse primer sequence, rather than the reverse complement.
Shortcut: if your RNA promoter (T7/T3/SP6) initiates RNA synthesis in a clockwise direction, you have to add a PolyT to the reverse primer.
If your promoter initiates RNA synthesis in the counter clockwise direction, your “forward” primer is now technically the end of the gene, so all you have to do is add the PolyT tail to the left (5’) end of the “reverse” complementary base pairs.

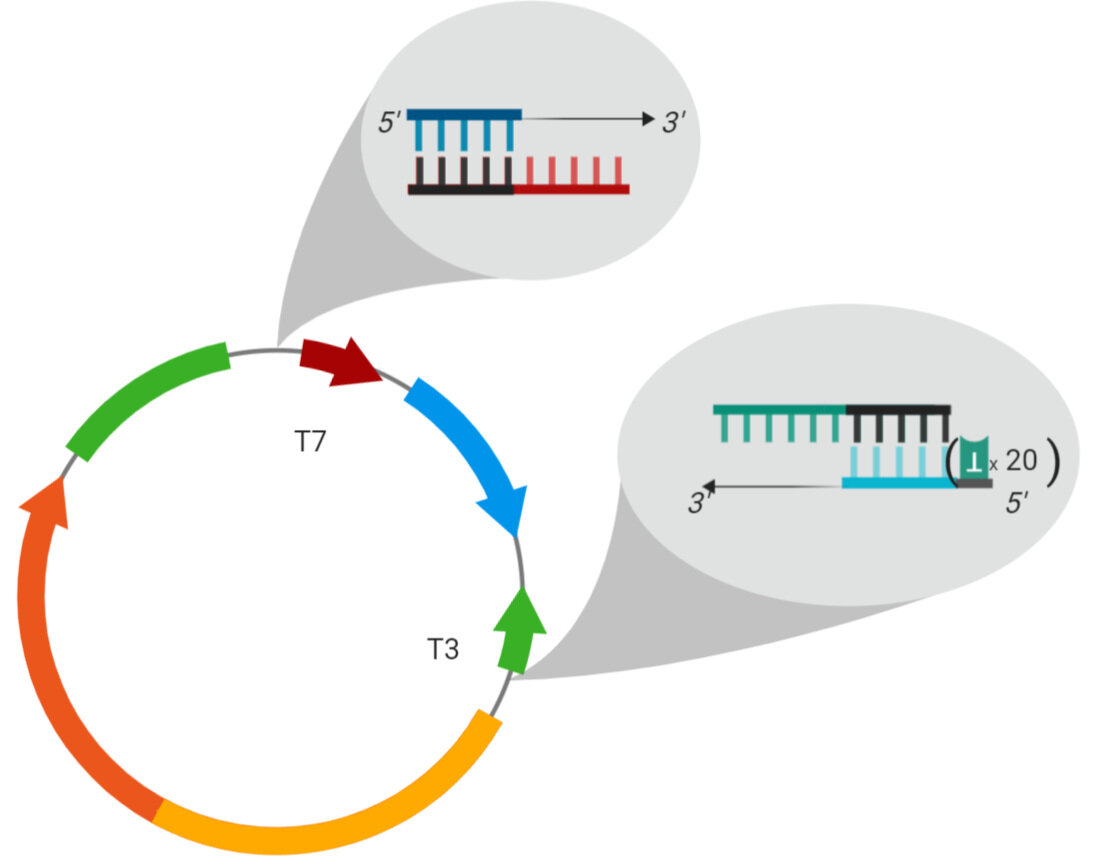
Here’s a diagram of a PolyA PCR experiment where you want to initiate transcription in the clockwise direction. A circular plasmid may have two promoter sites, but the gene’s start codon is read correctly only if you start transcription using the promoter on top. On the bottom, we have ht end of the gene. In this diagram, we see that designing a primer to include only the promoter sequences is problematic, because the top promoter sequence Tm is a little low, and the bottom (reverse) promoter sequence will still have a hairpin structure at the reaction Tm. Its best to design a forward primer that is complementary to the backbone and a little bit of the promoter sequence. The forward primer will amplify in the 3’ direction, so it will fill in the remaining promoter sequence. If you decided to use only the end of the gene and the 3’ untranslated gene region for your reverse primer, your Tm is now very high, because of a high GC content. To overcome these problems, design a reverse primer that includes the plasmid backbone and a bit of the promoter sequence.
Remember the DNA synthesis occurs 5’=>3’, and that DNA is double stranded. The complementary strand (black arrow) and the anticomplement (green arrow) are synthesized the same way, just in opposite directions, i.e. they meet int he middle. This diagram may seem a little misleading, but the polyT sequence will be at the beginning of your primer when you send it off for synthesis, because the 5’ part of the primer, in the context of the anticomplement DNA strand, beasically just hangs off the end. Putting a polyT at the 3’ end of the reverse primer will lead to no DNA synthesis because you introduced a bunch of T residues at the beginning of the DNA synthesis step, residues that aren’t there. That’s going to make DNA synthesis stop since the primer isn’t complementary to the template DNA (trust me I learned the hard way.)

In this diagram, we see the same issues as before, but now we want to initiate transcription using the bottom promoter, so our sequence directions are reversed. We still have to add the polyT residues to the beginning part of a primer, but now instead of adding it to the reverse primer (which will start gene synthesis) we have to add it to the forward primer (which is after the stop codon of the gene.) Again, you have to consider things like GC content and hairpin Tm, which makes universal primer design a little more difficult. It may be worth your while if you’re working with a lot of different genes in the same plasmid.